


When you notice a red light on your garage door sensor, it’s not just a random glitch—it's the system's way of telling you something is wrong. Think of it as a direct signal that the safety feature has been triggered. Most of the time, this points to a simple problem like a physical obstruction blocking the door's path or the two sensors being knocked out of alignment.
What the Red Light on Your Sensor Really Means
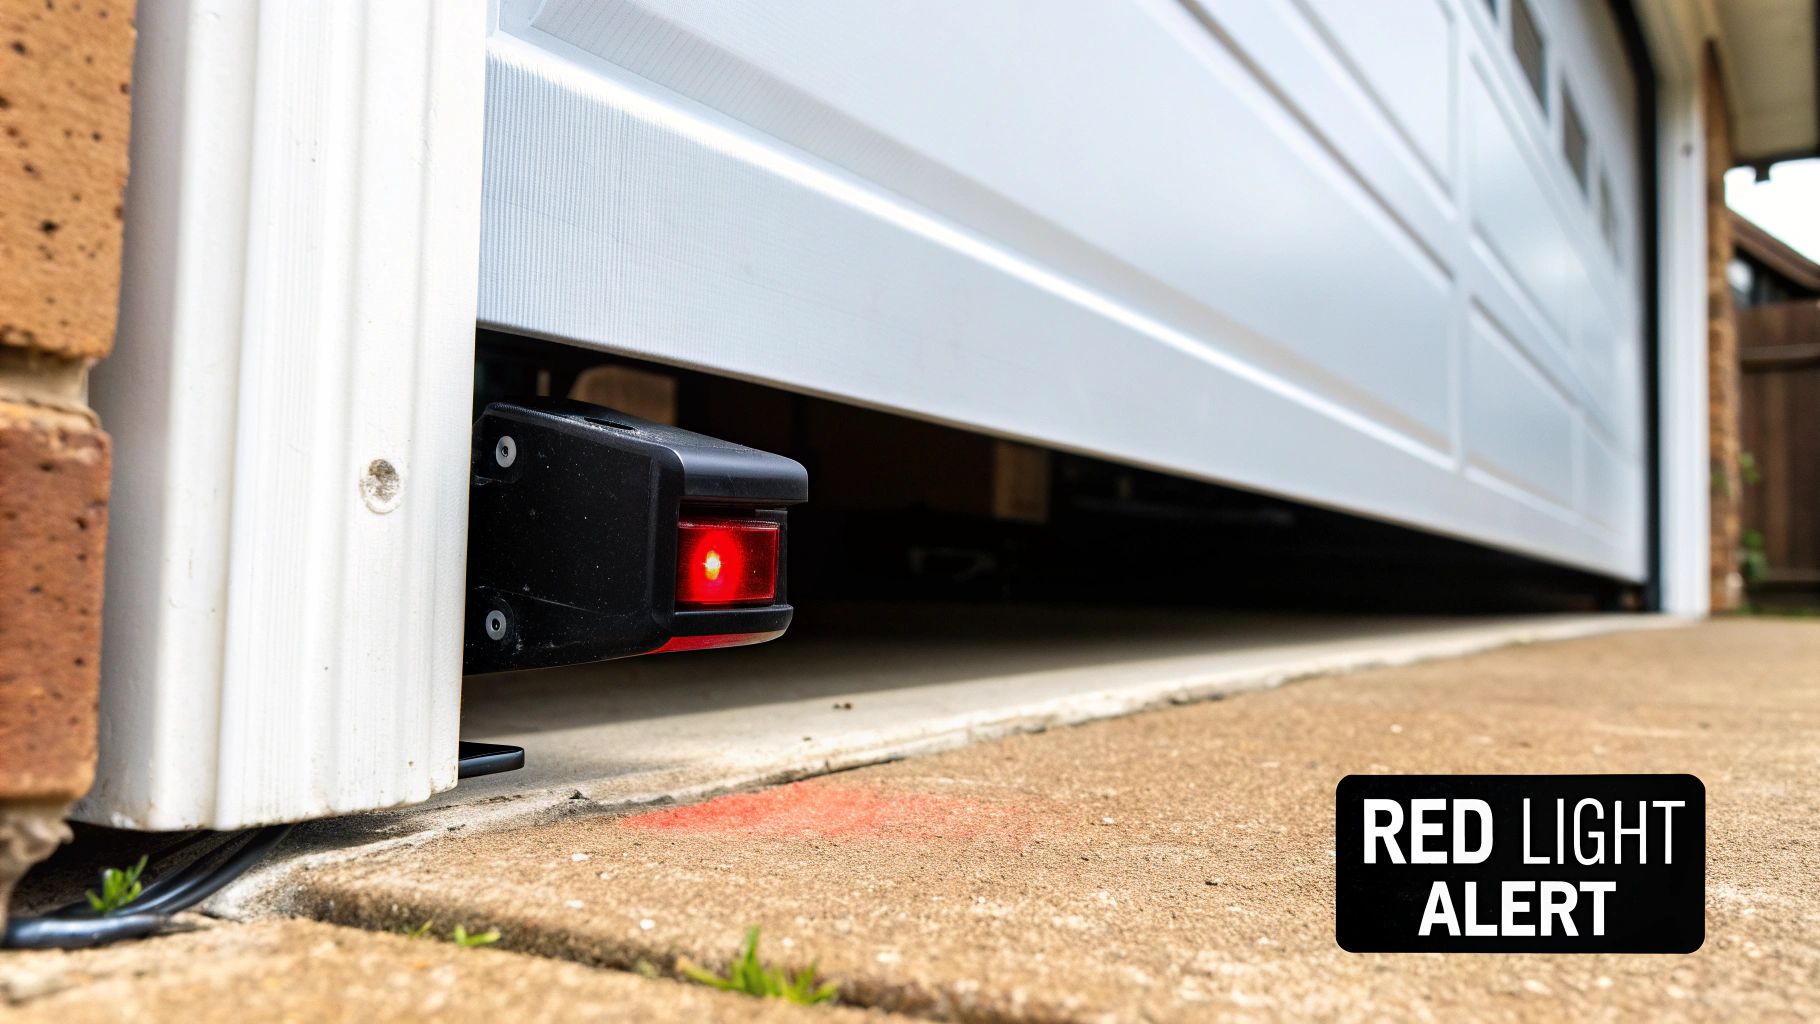
That glowing red light is more than just an annoyance; it's a critical communication tool. Its job is to tell you exactly why your garage door has stopped working, preventing potential accidents before they happen. While the specific meaning can vary slightly between brands like LiftMaster or Genie, the root causes are almost always the same.
Understanding this signal is the first step toward a quick fix. Instead of feeling frustrated, you can use the light's behavior to become your own detective. Is the light solid or is it blinking? The answer will point you in the right direction.
To help you troubleshoot, here’s a quick breakdown of what the red light usually means.
Quick Guide to Red Sensor Light Meanings
| Light Status | Common Cause | First Action to Take |
|---|---|---|
| Blinking Red Light | The sensors are misaligned and cannot "see" each other. | Check both sensors to ensure they are pointing directly at one another. Adjust by hand until the light turns green. |
| Solid Red Light | An object is blocking the invisible infrared beam. | Clear the area between the two sensors. Look for boxes, tools, toys, or even cobwebs. |
| Red Light on One Sensor Only | This typically indicates a wiring or power issue with that specific sensor. | Inspect the wires connected to the sensor for any damage or loose connections at the sensor and opener unit. |
This table should get you started, but let's dive a little deeper into the common culprits.
Decoding the Different Signals
More often than not, the reason behind a red sensor light is a simple misalignment. It happens all the time. One sensor gets bumped by a trash can, a lawnmower, or even a stray basketball, and suddenly the infrared beam is off its target. The receiving sensor, unable to "see" the beam, triggers the red light and stops the door from closing as a safety precaution.
Beyond alignment, here are a few other frequent causes:
- Obstructions in the Path: Even small items like a stray leaf, a thick cobweb, or a child's toy can be enough to break the beam's connection.
- Dirty Sensor Lenses: Dust and grime can build up on the sensor's "eye," effectively blinding it and causing it to report an error. A quick wipe with a soft, dry cloth is often all it takes.
- Wiring Complications: Sometimes, the issue lies with the low-voltage wires connecting the sensors to the main opener unit. A loose connection, a frayed wire, or corrosion can disrupt the power supply.
A persistent red light is the garage door opener's way of protecting you. It’s a built-in failsafe that forces you to address a potential safety hazard before the door can operate normally again.
The Growing Importance of Sensor Technology
These safety sensors are a standard, legally required feature on all modern garage doors for a reason. Their reliability is part of a larger trend toward safer and smarter home technology. The market for these components reflects this, as the global residential garage door accessories sector was valued at around $5 billion in 2022 and is expected to climb to over $8 billion by 2033. This growth highlights how much homeowners are prioritizing dependable safety systems.
Ultimately, diagnosing the red light is just the starting point. If the sensor issue is a symptom of a larger problem, it helps to understand other common reasons your garage door opener is acting up.
Simple Checks and Cleaning for Your Safety Sensors
Before you start thinking the worst, let me tell you from experience: the most common reasons a garage door sensor shows a red light are usually the simplest to fix. You don't need to be a pro for these first checks. More often than not, the culprit is something as small as a bit of dust, a stray object, or even a cobweb you can barely see.
Start by just taking a good look at the area between the two sensors. Scan high and low. It's surprisingly easy to miss something small, like the handle of a rake leaning against the wall, a kid's toy that rolled into the beam's path, or a plant that's grown just a little too wild. These are the usual suspects that can instantly trigger that red light and stop your door cold.
A Clear Path Is a Safe Path
Once you've made sure nothing is blocking the beam, it's time to get a closer look at the sensors themselves. Over time, those little lenses can get a film of dust, dirt, or even moisture from morning condensation. That grime can block the infrared signal just as effectively as a solid object.
This is actually the first and most important step in the whole process.
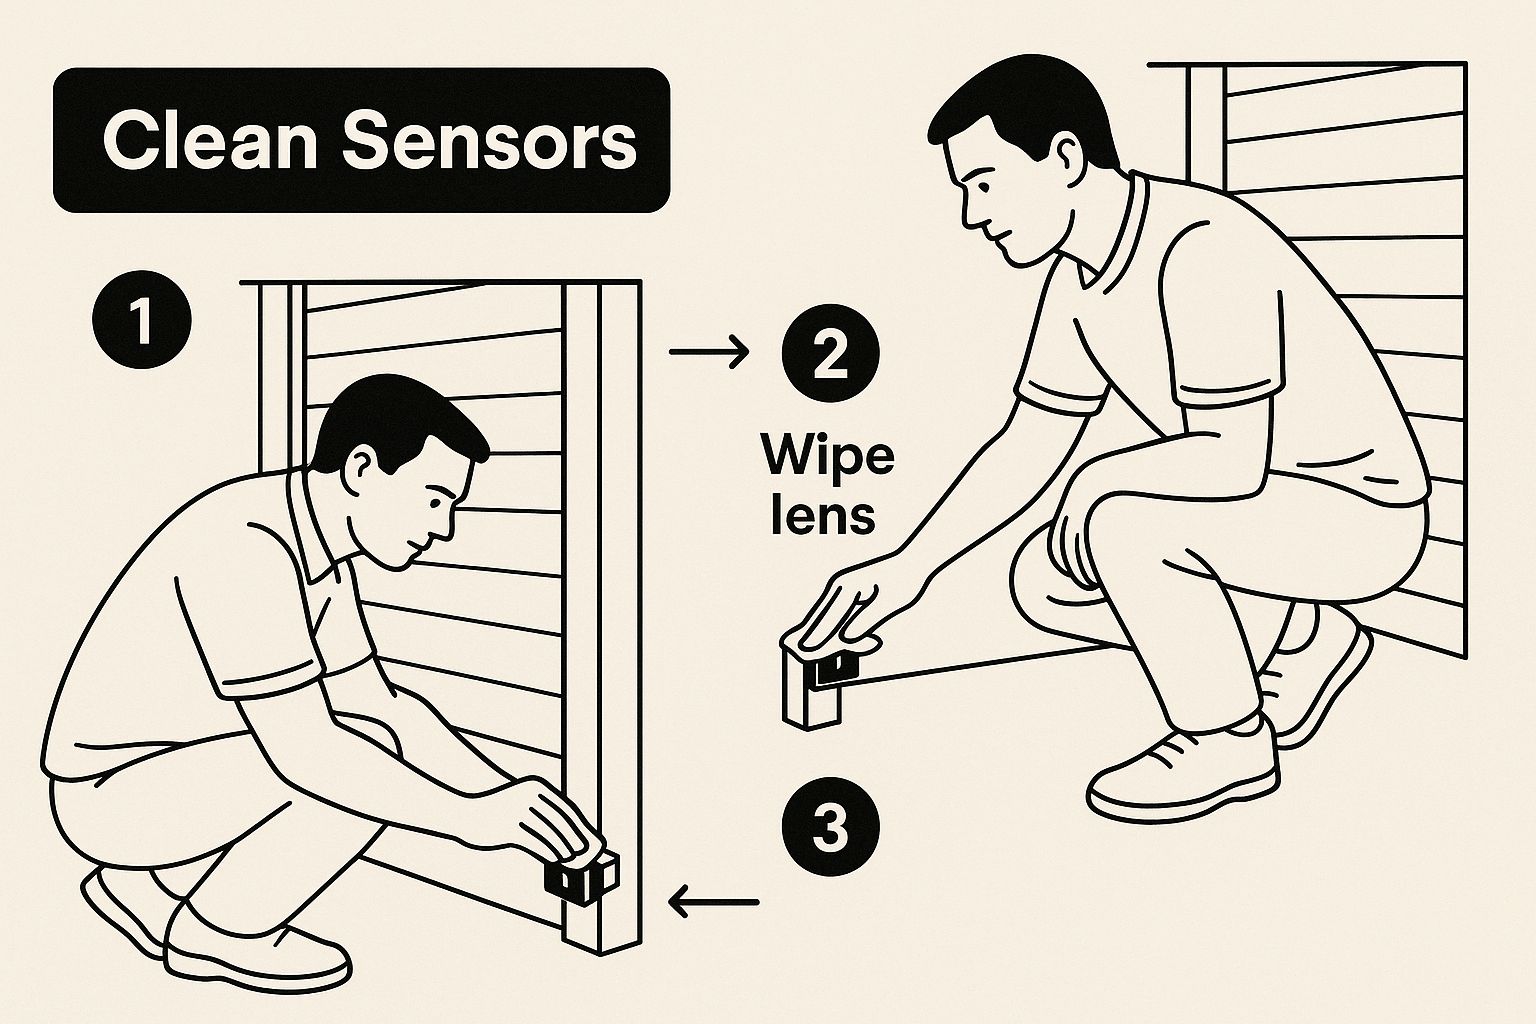
Honestly, a gentle cleaning of the sensor lenses solves a huge number of red-light issues. No tools, no technical skills needed.
To do it right, grab a soft, dry microfiber cloth. It's perfect because it won't scratch the plastic lens. Stay away from harsh chemical cleaners or a lot of water, since that can damage the electronics inside. A quick, gentle wipe is usually all it takes to get things working again.
The Importance of Routine Upkeep
Taking just a few minutes for these quick checks can save you a ton of time and frustration down the road. It’s a basic part of keeping your entire garage door system healthy.
A clean sensor and a clear path are the foundation of a reliable garage door safety system. Ruling out these simple issues first will make any further troubleshooting much more effective.
Making this quick inspection a part of your regular home maintenance routine can stop future headaches before they start. If you want to get more proactive, our garage door maintenance checklist is a great resource for keeping the whole system running smoothly. A little bit of consistent care helps ensure every part, from the sensors to the springs, works safely year-round and reduces the odds of a sudden breakdown.
How to Perfectly Align Your Garage Door Sensors
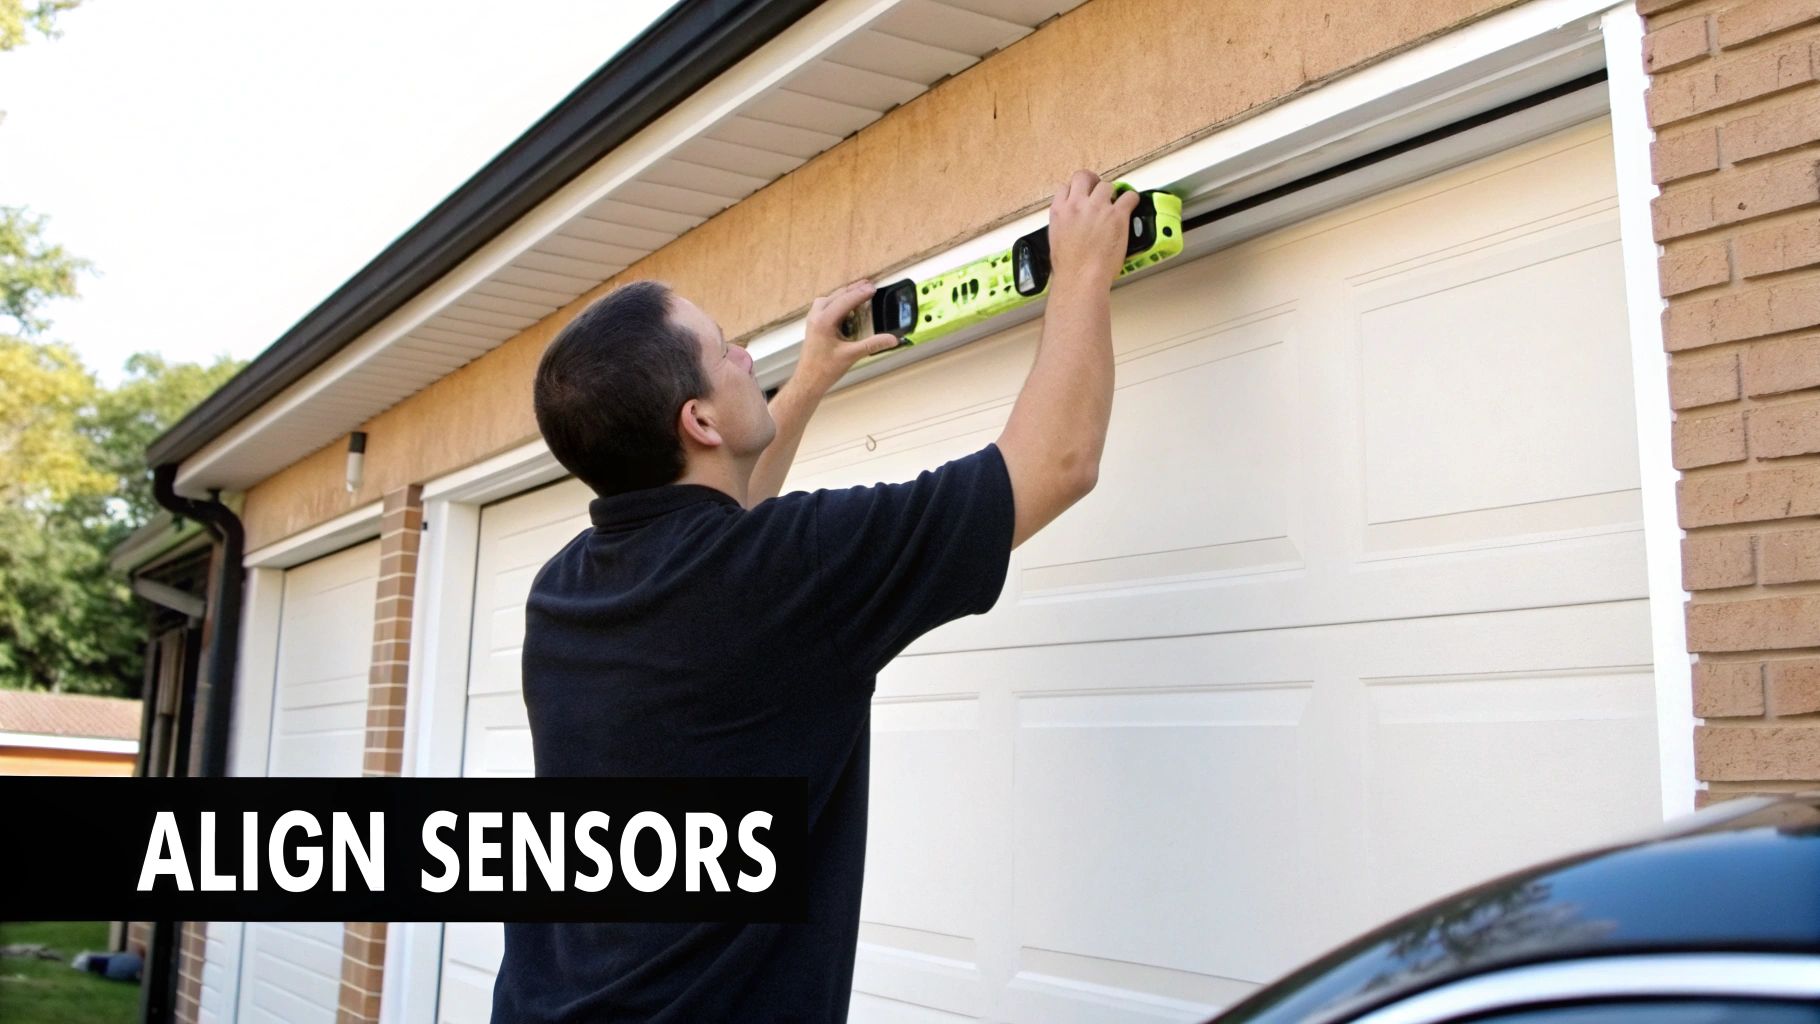
If you’ve already cleaned the lenses and made sure nothing is blocking the path, but that red light is still glaring at you, alignment is almost certainly the culprit. Misalignment is one of the top reasons a garage door sensors red light stays on, refusing to let the door close. It happens all the time—a stray bump from a lawnmower, a kid's bike, or a garbage can is all it takes to knock a sensor just slightly out of position.
Getting the alignment perfect isn't just about making the red light go away. It’s about creating a rock-solid, reliable connection that ensures this critical safety feature works correctly every single time. The good news is that with a little patience, you can dial it in yourself.
Start with the Brackets
Before you start fiddling with the sensors, check their foundation: the metal brackets holding them in place. These are usually mounted to the garage door tracks or the adjacent wall, and they can easily get bent or loosened over time.
Give each bracket a gentle wiggle. If you feel any play, the mounting screws are probably loose. Grab a screwdriver or socket wrench and tighten them up until they’re secure. You can't get a stable alignment if the base is wobbly, so this is a crucial first step.
Let the LED Lights Be Your Guide
The little LED lights on the sensors are your best friends for this job. They give you instant feedback, letting you know whether you're getting warmer or colder. While the exact colors can vary by brand, the concept is universal:
- The Sending Sensor: This one usually has an amber or yellow light. As long as it has power, this light should be on and steady because it's constantly sending out the infrared beam.
- The Receiving Sensor: This sensor, which typically has a green light, is your target. When its light is off, flickering, or red, it means it's not "seeing" the beam from the sending unit. Your one and only goal is to get this light to turn solid and steady.
Start by making small, careful adjustments to one of the sensors. Loosen the wing nut just enough so you can pivot the sensor up, down, left, or right. Move it in tiny increments, pausing for a second after each nudge to see how the receiving sensor’s light responds.
Pro Tip: When you finally get that solid light, don't crank down on the wing nuts. A snug fit is all you need. Overtightening can strip the threads or even crack the plastic housing, turning a simple fix into a much bigger headache.
Nailing the Alignment with a Little Help
If you're still struggling to get a solid light just by eyeballing it, a couple of simple tools can make it a breeze. A string line or a laser level works wonders for precision. Just stretch a string from the center of one sensor's lens to the other. If the string isn't perfectly level, you'll know exactly which way to adjust. A laser level does the same thing but gives you a crisp visual line to follow.
The demand for these safety features is only growing. The global market for automatic door sensors, which includes these garage components, was valued at USD 1.47 billion in 2023 and is expected to hit USD 2.4 billion by 2031. This shows just how critical reliable safety tech has become for homeowners. You can discover more insights about the automatic door sensor market to see the trends for yourself.
Finally, after getting the sensors perfectly aligned, you might find that the door's travel limits are slightly off. If the door doesn't seem to open or close to the right spot anymore, you may need to learn more about how you adjust a garage door opener to fine-tune its performance.
Troubleshooting Wiring and Connection Problems
So, you’ve cleaned the lenses and made sure the sensors are perfectly aligned, but that pesky red light still won’t turn off. When this happens, it’s time to dig a little deeper. More often than not, the issue is hiding in the low-voltage wiring that runs from the sensors back to the main opener unit.
It might sound technical, but you can often spot the problem with a careful visual check—no fancy tools required.
First things first: safety. Before you even think about touching a wire, you absolutely must cut the power to your garage door opener. The easiest way is to unplug the unit from the outlet on your ceiling. If that’s not accessible, head to your home's electrical panel and flip the breaker for the garage. Don't skip this.
Start With a Thorough Visual Inspection
With the power safely off, let's start at the sensors. Take a close look at where the thin wires connect to the back of each one. Are the connections snug? You shouldn't see any loose, exposed, or corroded copper. After years of temperature swings and moisture in the garage, these tiny connections can start to degrade.
Now, it’s time to play detective. Follow the wire from each sensor all the way back to the motor unit mounted on the ceiling. This wire is usually tacked along the walls or ceiling with staples. Pay very close attention to every spot where a staple holds the wire.
- Pierced Wires: Sometimes, an installer gets a little too aggressive with the staple gun and drives it right through the wire's thin insulation. This can create a short and is a classic cause of the garage door sensors red light.
- Frayed or Pinched Wires: Look for any spots where the wire might be bent sharply, pinched between two surfaces, or frayed from rubbing against a rough edge.
- Pest Damage: It's more common than you'd think. Mice and other pests love to chew on wiring in garages. Check the entire length of the cable for any obvious signs of gnawing.
If you spot a section that looks damaged, you’ve probably found your culprit.
A stable electrical connection is just as critical as a clear line of sight for your sensors. A single loose wire or a tiny break in the insulation can disrupt the entire safety system, leading to that persistent red light.
Checking Connections at the Opener Unit
The last place to check is where the sensor wires connect to the motor unit itself. You'll see a block of screw terminals where these low-voltage wires are held in place. Give each wire a gentle tug to make sure it’s secure. The vibrations from the opener running over the years can sometimes wiggle these connections loose.
If you find a loose wire, just loosen the screw for that terminal, push the wire back in so it makes solid contact, and tighten the screw back down. Make sure you’re matching the colors correctly—usually, one wire is solid white and the other has a black stripe.
If the wiring looks perfect and you suspect the sensors themselves have finally given up, it helps to know what you’re in for. You can check out our detailed guide on how much garage door sensors are to get a better idea of replacement costs. But honestly, a simple wiring fix is often all it takes to get things working again.
Final Checks for Advanced Sensor Issues
When the usual fixes like cleaning the lenses, checking alignment, and wiggling the wires don't solve the problem, it’s time to dig a little deeper. Sometimes, a stubborn garage door sensors red light is caused by something less obvious, but a few final checks can usually pinpoint these trickier issues.
One surprisingly common culprit is direct sunlight interference. Think about it—the receiving sensor’s whole job is to detect an infrared beam. But intense sunlight also contains infrared light, and a direct blast of it can completely overwhelm the sensor.
This usually happens at specific times of day, like in the morning or late afternoon, when the sun is low in the sky and shines straight into the sensor's lens. It effectively blinds the sensor, making it think something is blocking the path and triggering that persistent red light.
If you think this is what's happening, you have a couple of simple options. The easiest fix is to create a small shade shield. You can rig one up with a small piece of cardboard or even an empty toilet paper roll. Just place it around the sensor to block the direct sun while still allowing it to see its partner across the door. It sounds low-tech, but it works wonders.
When the Sensor Itself Gives Up
Sometimes, the problem isn't external—it's the sensor itself. After years of dealing with moisture, temperature swings, and constant vibrations from the door, the internal electronics can simply wear out. This is what we call internal sensor failure.
I've seen plenty of sensors fail over the years. The signs are usually pretty clear if you know what to look for:
- The LED light might be flickering or look really weak, even when the alignment is perfect.
- You'll see the red light come on and off intermittently, with no rhyme or reason.
- The sensor is completely dead, even after you've confirmed the wiring is good and has power.
If you’ve walked through every other troubleshooting step and nothing has worked, it's a safe bet that one or both of your sensors need to be replaced. They almost always come in pairs, and you should always replace them that way to guarantee they'll talk to each other correctly.
A key takeaway here: sensors from different brands, or even different models from the same brand, are rarely interchangeable. Trying to mix and match them is a recipe for constant errors or a safety system that doesn't work at all.
Power Surges and Mismatched Parts
Power surges from storms or grid issues can also fry the delicate electronics inside your garage door opener and its sensors. If you had a recent power outage and the red light issue popped up right after, a surge is a likely suspect.
Finally, think about compatibility. If you recently replaced just one sensor, it might not be playing nice with the older one. Always replace sensors with the exact model recommended by the manufacturer or a universal kit certified to work with your specific opener.
The technology behind these systems has come a long way. The global smart garage door controller market, which relies on these sensor advancements, is projected to grow from USD 0.71 billion in 2025 to USD 1.12 billion by 2030. You can read the full research about smart garage door market growth to see the trends. This growth just shows how specialized and integrated these components have become, which is why using the right parts is so important.
Common Questions About Garage Door Sensors
Even with a step-by-step guide, you might still have a few lingering questions. Let's tackle some of the most common ones that homeowners run into when dealing with a stubborn garage door sensors red light. Getting quick, clear answers can make the whole process much smoother.
Can I Bypass My Garage Door Sensors Temporarily?
Yes, most garage door openers have a built-in override function. You can typically bypass the sensors by pressing and holding the wall-mounted button until the door closes completely.
But—and this is a big one—this is meant for emergencies only. It should never be used as a permanent solution. When you override the sensors, you're disabling a critical safety feature. You have to be absolutely certain the path is clear before and during closing, as the door will not reverse if it hits something. The underlying sensor issue must be fixed right away to get back to safe, automatic operation.
Why Is One Sensor Green and the Other Red?
This is the classic sign of a sensor alignment problem or a blockage. One light is green and the other is red (or sometimes amber). Think of them as a team playing catch.
The green light is on the receiving sensor, which is basically saying, "I have power, but I'm not catching the beam!" The other sensor, usually amber or red, is the sender—it's throwing the infrared beam just fine.
When you see this green-and-red combination, your first move should always be to check for physical obstructions. If the path is clear, the next step is to gently adjust the alignment until the receiving sensor's light turns solid green, confirming it caught the beam.
How Do I Know if My Sensor Needs Replacing?
Figuring out if a sensor has truly failed comes after you've exhausted all the other possibilities. It's a process of elimination.
If you have meticulously cleaned the lenses, confirmed the alignment is perfect with a string or level, and thoroughly inspected the wiring for any visible damage—but that red light persists—the sensor itself has likely given up.
Another tell-tale sign is an LED light that flickers erratically or seems very dim, even when you know the alignment and power are solid. Once you've ruled out every other possibility, replacement is the logical next step.
If you've tried these solutions and your garage door sensors still won't cooperate, it might be time for a professional diagnosis. For expert service in Scottsdale, Phoenix, and the surrounding areas, contact Security Door Gate and Fence to ensure your system is safe and reliable.


 (480) 548-0807