


Before you can even think about fixing a garage door chain, you have to know what you’re dealing with. A good repair isn't just about swapping parts; it’s about understanding how the chain, motor, and trolley all work together to lift that heavy door. Getting this foundation right is the key to doing the job safely and effectively.
Understanding Your Garage Door Chain Drive System
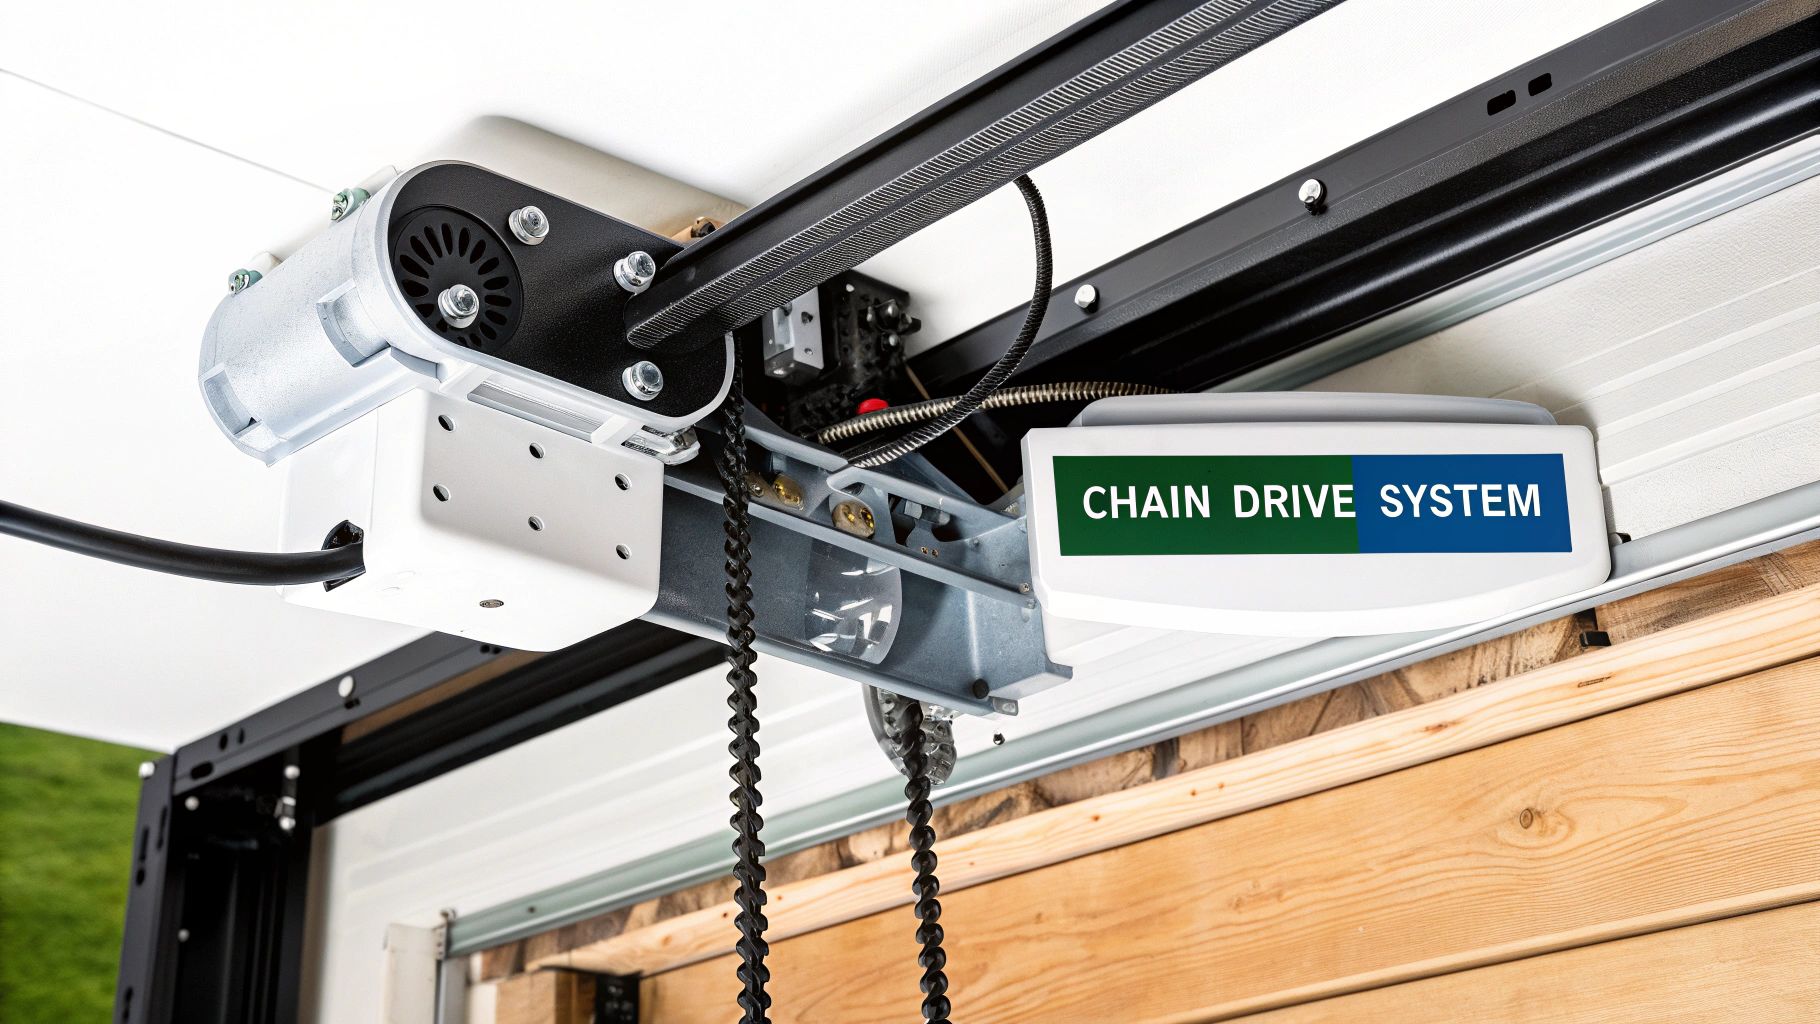
A chain drive opener is a classic for a reason. It's a powerhouse system known for its sheer strength and durability, which is why it's been a go-to for lifting heavy garage doors for decades. The mechanics are straightforward—think of it like a heavy-duty bicycle chain, but with a lot more muscle.
At its core, the system is a team of parts working in perfect sync. The electric motor, which is that main unit mounted to your ceiling, acts as the heart of the operation. It turns a sprocket that grabs the chain and pulls it along a metal rail, which then moves a trolley connected to your garage door.
The Core Components
Knowing what each part does makes it a whole lot easier to figure out what went wrong. When you can identify the role of each component, you can spot the problem in no time.
- The Chain: This is the system's workhorse. It runs in a loop around sprockets at the motor and the far end of the rail, doing the actual pulling and pushing that moves the door.
- The Motor and Sprocket: The motor brings the power, turning a gear (the sprocket) that bites into the chain's links and gets everything moving.
- The Rail: This long metal track is the skeleton of the system. It keeps the chain and trolley moving in a straight, steady line.
- The Trolley: This little carriage rides on the rail and connects the chain to the door arm. It’s the bridge that transfers all that pulling force from the chain to the door itself.
Why Chain Tension Is So Important
You can't mess around with chain tension; it has to be just right for the opener to work smoothly and safely. If the chain is too loose, it will sag and make a slapping or rattling noise every time the door moves. That slack can cause jerky movement and, if you're really unlucky, let the chain jump right off the sprocket.
On the other hand, a chain that's too tight puts a ton of strain on the motor's gears and the sprockets. All that constant stress will wear parts out fast and can lead to major mechanical failures down the line. The sweet spot is having the chain just tight enough so it hangs about a quarter-inch above the bottom of the rail.
A correctly tensioned chain doesn't just run quieter—it dramatically extends the life of your opener's motor and gears. A sagging chain is often the first warning sign of a much bigger repair bill on the horizon.
The need for dependable garage doors is only growing. The global garage door service market is expected to jump from USD 4.78 billion in 2025 to USD 7.16 billion by 2032, which shows just how many people rely on these systems every day. You can read more on these market trends over at Coherent Market Insights. And while chain drives have proven their longevity, you can see how they stack up against modern systems in our guide to different garage door openers.
How to Diagnose Common Chain Drive Problems

Before you even think about grabbing a wrench to repair garage door chain components, you need to put on your detective hat. The strange sounds and jerky movements your door is making are clues, and each one points to a specific culprit. Learning how to read these signs is the first real step toward a successful fix.
That distinct rattling or slapping sound you hear when the door moves? That’s the classic sign of a sagging chain. It's more than just an annoying noise—it’s a clear signal of improper tension that’s causing jerky, rough operation. If you let it go, that slack can eventually cause the chain to jump right off the sprocket, bringing your door to a dead stop.
Pinpointing the Exact Issue
Sometimes, the issue is more dramatic than just a bit of noise. The door might refuse to move at all. If you can hear the motor humming away but the door isn't going anywhere, you could be dealing with a completely broken chain or stripped gears inside the opener itself. This is where a quick visual inspection becomes your best friend.
Take a close look at the chain. Is it visibly hanging down from the rail? That's what we call excessive slack. While you're at it, scan the entire length of the chain for any links that look twisted or broken. Don't forget to check the sprockets—the toothed wheels at the motor and the end of the rail—for any teeth that look worn down or have snapped off.
A correct diagnosis saves you time and keeps you from buying parts you don't need. Knowing the difference between a simple tension adjustment and a worn-out sprocket is what separates a temporary fix from a lasting repair.
If your garage door opener is acting up in other ways, like reversing for no reason or having sensor issues, the chain might not be the problem at all. For a deeper look into those other malfunctions, you can discover more about the reasons your garage door opener is acting up in our detailed guide. It'll help you rule out other common problems first.
Translating Symptoms into Action
To help you quickly get to the root cause, it pays to match the specific behavior of your door with the most likely problem. A systematic approach to diagnosis takes the guesswork out of the equation.
Here’s a quick-reference table to help you connect what you're seeing and hearing with the likely culprit and what to do next.
Common Chain Issues and Their Symptoms
| Symptom | Likely Cause | Recommended Action |
|---|---|---|
| Loud slapping or rattling noise | The chain is too loose (sagging). | Perform a chain tension adjustment. |
| Jerky, inconsistent movement | Uneven tension or a stiff link. | Adjust tension and lubricate the chain. |
| Motor runs but door doesn't move | The chain has broken or jumped the sprocket. | Inspect for a break and prepare for replacement. |
| Grinding sound from the motor unit | Worn or stripped drive gear (sprocket). | Inspect the main drive gear for damage. |
By carefully observing your system and using this table as a guide, you can move from pure guesswork to a clear, confident plan. Once you know exactly what’s wrong, you can gather the right tools and parts, ready to tackle the repair.
Essential Safety Steps and Tools for the Job
Let's get one thing straight: trying to fix a garage door chain without putting safety first is a huge mistake. These systems are under an incredible amount of tension, and the door itself can weigh hundreds of pounds. One wrong move could lead to a serious injury or some pretty nasty property damage. So, before you even think about touching that chain, there are a few non-negotiable steps to take.
The absolute first thing you have to do is cut the power to the opener. Don't just flip the wall switch. Go to the motor unit itself and unplug it directly from the outlet. This guarantees the motor can’t kick on by accident while your hands are in there, which would be a complete disaster.
This infographic breaks down the three critical safety actions you must take before you start.
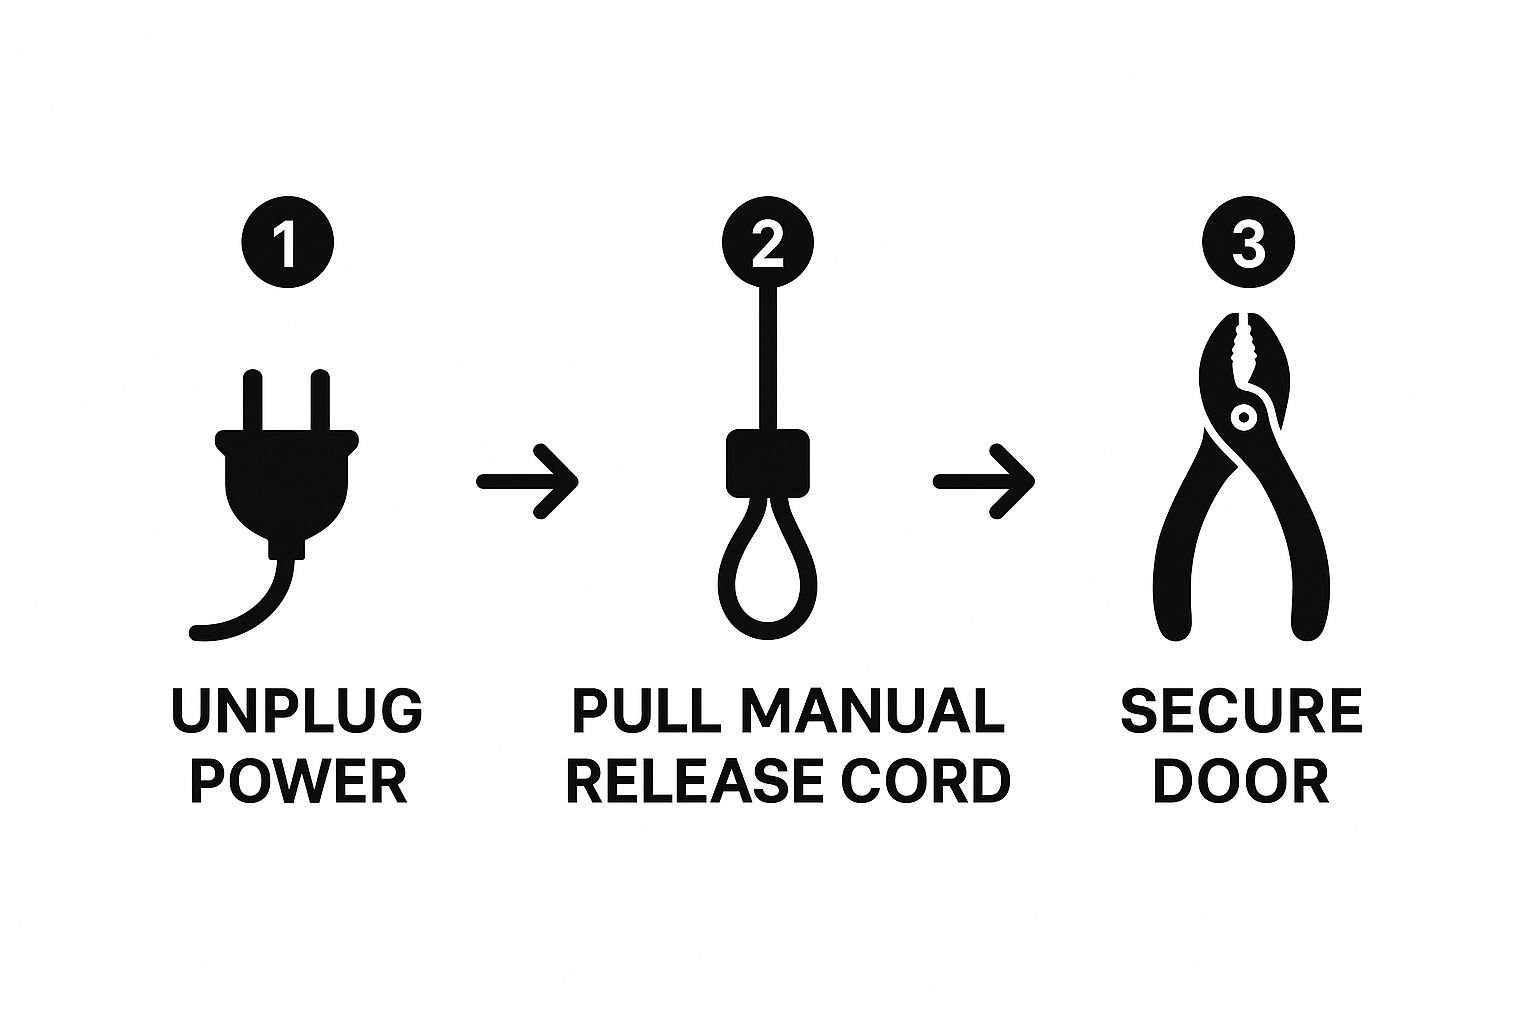
Following that sequence—power off, release the door, and secure it in place—is the only way to create a safe work area for this kind of repair.
With the power disconnected, your next move is to disengage the door from the opener. Find the red manual release cord hanging from the trolley assembly on the rail. Give it a firm pull, and you'll disconnect the trolley from the chain. Now you can move the door up and down by hand.
Gathering Your Essential Tools
Once the door is secured, it's time to get your tools in order. Having everything you need nearby saves you from making a dozen trips up and down the ladder and helps the job go smoothly. A messy workspace is a recipe for frustration and careless mistakes.
You’ll need a pretty basic set of tools, but a couple of them are absolutely crucial for getting this done right and safely.
- A Sturdy Stepladder: Make sure it's tall enough to let you work comfortably on the opener rail and motor without stretching.
- Socket and Wrench Set: You'll need these for the tensioning nuts on the trolley and possibly for the bolts holding the motor housing.
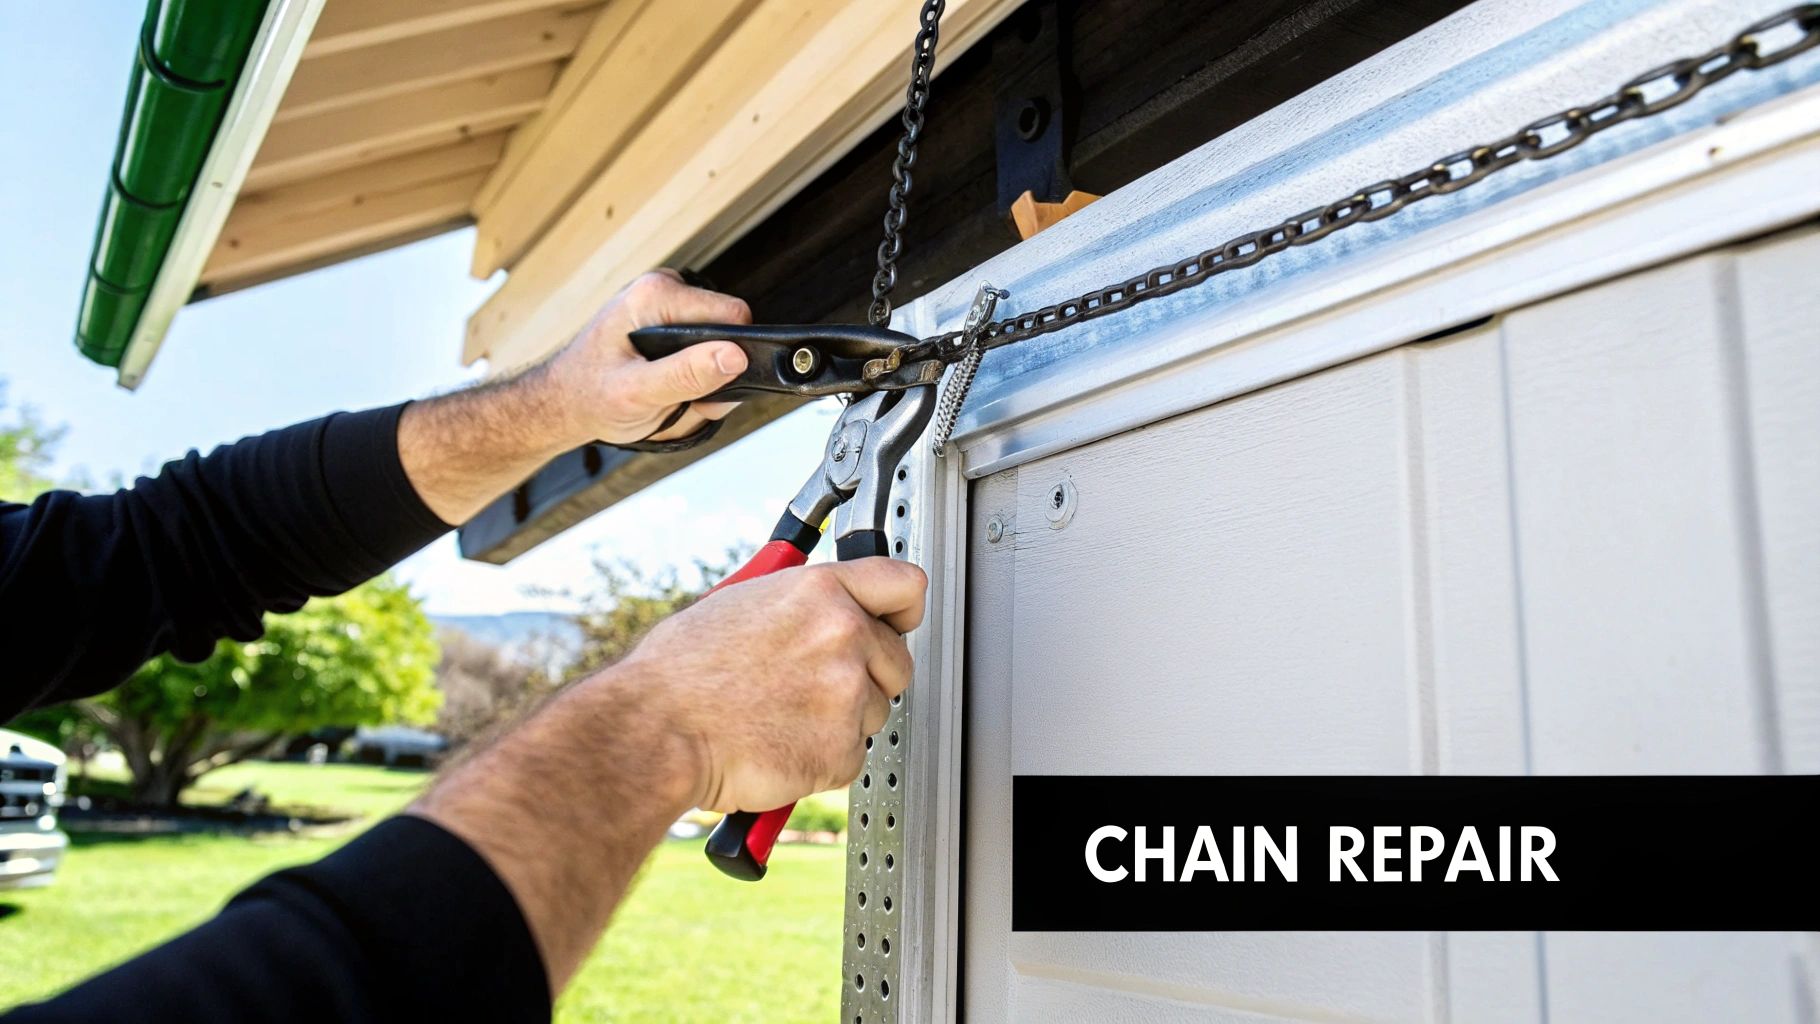
- Locking Pliers (Vise-Grips): This is your most important safety tool, hands down. After you close the door manually, clamp a pair of locking pliers tightly onto one of the vertical tracks, right above a roller. This acts as a physical block, preventing the door from unexpectedly flying open if the springs are still under tension.
- Flathead Screwdriver: Comes in handy for prying open the master link on the chain.
- Work Gloves and Safety Glasses: Protect your hands from grease and sharp metal, and keep debris out of your eyes.
Think of the locking pliers as your insurance policy against gravity. The moment the door is disconnected from the opener, the springs are the only thing holding its weight. A properly placed set of pliers ensures the door stays put, no matter what.
Fixing and Replacing Your Garage Door Chain
Okay, you've diagnosed the problem and have your safety plan sorted. Now it's time to get your hands dirty. Whether you're doing a simple adjustment or swapping out the entire chain, the trick is to be methodical. This isn't a race—patience and precision are what will give you a lasting repair garage door chain fix.
In a lot of cases, the only problem is a loose, sagging chain. After thousands of opening and closing cycles, a bit of stretching is totally normal. Tightening it back up is often a quick adjustment that will make a huge difference in how your opener sounds and performs.
Tightening a Loose Garage Door Chain
First thing's first: find the tensioning nuts. Take a look at the trolley—that's the carriage that slides along the rail. You should see a threaded rod with two nuts on it, an inner and an outer one. Those are your adjustment points. Before you touch them, move the trolley so it's about halfway down the rail to help keep the tension even.
Grab two wrenches. Use one to hold the inner nut still while you turn the outer nut clockwise. This will start pulling the chain tighter. Don't go crazy here; just make small, quarter-turn adjustments at a time. After each little turn, check how much the chain is sagging.
The goal is not to make the chain guitar-string tight. You want about a quarter-inch of clearance between the bottom of the chain and the rail itself. This slight sag is crucial for smooth operation and prevents excessive wear on the sprockets and motor.
Once you hit that sweet spot, tighten the inner nut back up against the outer one to lock it all in place. This simple tweak can get rid of that awful chain-slapping noise and make sure it's gripping the sprocket like it's supposed to.
Performing a Full Chain Replacement
If you found a broken link or saw some serious wear and tear during your inspection, replacing the whole chain is the way to go. A broken link is often a sign that the entire chain is fatigued, so just patching it is asking for trouble later. This job is a bit more involved, but it's nothing you can't handle.
Start by loosening the tensioning nuts on the trolley as far as they’ll go. You want the chain completely slack. Next, hunt down the master link. It looks a little different from the other links and usually has a small clip or plate holding it together. A flathead screwdriver is perfect for prying that clip off so you can separate the chain.
With the old chain disconnected, carefully pull it off the sprockets on both ends of the rail. Now you're ready to thread the new one. Here’s a pro tip: before you pull the old chain all the way out, use a small piece of wire or a zip tie to connect the new chain to the end of the old one. As you pull the old one off, it will guide the new one perfectly around the far sprocket, saving you a massive headache.
Once the new chain is threaded, connect the ends with the new master link from your kit and make sure the clip is on securely. From there, just follow the same steps for tensioning a loose chain, adjusting the nuts until you have that perfect quarter-inch of sag.
With construction rates high and strict safety standards in place, the garage door repair market is well-established. North America, for instance, commanded approximately 40% of the global market as of 2026.
While you're working on the chain, it's a perfect opportunity to give the other parts a quick look. If you spot any frayed cables or other damage, it's smart to take care of it all at once. For a similar repair, you can check out our guide on how to change a garage door cable. Getting everything in top shape at the same time ensures your whole system is good to go.
You’ve done the heavy lifting, but don't put your tools away just yet. The final steps are all about fine-tuning your work and making sure this fix lasts for the long haul. A few extra minutes here will separate a temporary patch from a permanent solution, giving you years of smooth, quiet operation.
First things first, let's get the door reconnected to the opener. Make sure the door is fully closed, then pull the manual release cord back toward the door. You should hear a distinct click as the trolley re-engages. Now, you can plug the opener back in.
Running a Test Cycle
This is the moment of truth. Stand clear of the doorway and use your remote to run the door through a full open-and-close cycle. This isn't just about seeing if it works; it's a diagnostic check. You need to pay close attention with both your eyes and ears.
- Listen for the right sounds: That awful slapping and rattling should be gone. What you want to hear is the quiet, steady hum of the motor and the chain gliding along the rail.
- Watch for even travel: The door should move at a consistent speed, with no jerking, stuttering, or hesitation.
- Check the final positions: Make sure the door closes all the way to create a good seal with the floor. On the way up, it should open completely without slamming into the stop bolt.
A great repair is all about quiet, predictable movement. If you still hear any grinding or see the door stuttering, that’s your cue to revisit the chain tension. It might need one more small adjustment to be perfect.
Setting Up a Proactive Maintenance Routine
The best way to avoid having to do this job again is to shift from fixing problems to preventing them. A simple maintenance routine only takes a few minutes every few months, but it can add years to the life of your opener.
Every three to six months, lubricate the chain and the entire length of the rail. A high-quality white lithium grease or a silicone-based spray made specifically for garage doors works best.
Visual checks are just as crucial. Once a month, give the chain a quick look to see if it’s developed too much sag. While you’re at it, inspect the teeth on both sprockets for any unusual wear, like chipping or sharp points. Catching these things early stops bigger problems from developing. For a complete guide, our detailed garage door maintenance checklist lays out a perfect schedule.
This kind of proactive care is a growing trend. In the Asia Pacific region alone, the garage door repair market is booming, expected to grow significantly from its 20% market share in 2026 as more homeowners embrace automation. You can read more about these global trends over at Dataintelo. A little bit of upkeep truly goes a long way in keeping your door working reliably day after day.
Garage Door Chain Repair FAQ
Even with the best instructions, you’re bound to have a few questions pop up while working on your repair garage door chain project. That’s perfectly normal. Here are some straightforward answers to the questions I hear most often from homeowners who are right in the middle of this job.
How Tight Should a Garage Door Chain Be
Getting the chain tension right is one of the most critical parts of the job. You’re not aiming for a guitar string here—in fact, a chain that’s too tight is a recipe for disaster.
A perfectly tensioned chain should have a little bit of sag to it. The sweet spot is about 1/4 to 1/2 inch of clearance between the bottom of the chain and the rail itself. You should be able to slide a finger between them easily. If you overtighten it, you’ll put a ton of unnecessary stress on the motor’s gears and sprockets, which will cause them to wear out way too soon.
Can I Repair a Single Broken Link
Technically, yes, you can patch a single broken link with a master link kit. But should you? Almost never. Think of it this way: a broken link is usually just the first sign that the entire chain is fatigued from years of metal stress.
The only real long-term solution is to replace the whole chain. It’s the only way to be sure every single link is strong and ready to handle thousands more open-and-close cycles without failing when you least expect it.
A single broken link is a warning sign that the rest of the chain is likely compromised. Investing in a full replacement now prevents a more inconvenient, and potentially damaging, failure down the road.
What Is the Best Lubricant for a Garage Door Chain
The kind of lubricant you choose makes a huge difference. You absolutely want to use a product made specifically for garage door systems. A white lithium grease or a high-quality, silicone-based spray is your best bet.
Steer clear of all-purpose household oils like WD-40 or any heavy automotive grease. These products are sticky and will actually attract dust, dirt, and grime, creating a gunky mess that causes more friction and leads to bigger problems.
Why Did My Chain Jump Off the Sprocket
A chain jumping its sprocket is a classic problem, and it usually comes down to one of a few things. Most often, the culprit is improper tension. A chain that's too loose will practically invite itself to slip off the sprocket's teeth as the door moves.
Another possibility is that the sprocket itself is misaligned, or the teeth have worn down over time and can no longer get a solid grip on the chain links.
If you've worked through these steps and are still running into issues, or if you'd just feel better with a professional eye on it, Security Door Gate and Fence is here to help. Our technicians have the experience to get your system running safely and reliably.
Contact us for expert service at https://securitygarageandgate.com.


 (480) 548-0807